There are so many guides and articles published about growing your blog traffic with Pinterest. However, even if I was reading through all of them, I made the exact same mistakes as if I wouldn’t read them at all. This is the reason that I decided to share my knowledge and experience on how to increase your blog traffic with Pinterest, so you won’t do the same mistakes as I did!
Disclosure: This article contains affiliate links. This means if you make click through and decide to make a purchase, I’ll earn a commission. I was also compensated for this article, though the full article is based on my own opinion.
If you’re new to blogging, or you’re new to using Pinterest as a blogger, you’ll now find out how to use Pinterest in blogging to succeed! You’ll also learn how to increase Pinterest traffic in 2021 if you’ve been struggling with that! Follow my guide and you’ll bring your blog to the next level!
Need a website first? Get started with the best hosting: BlueHost.
MAKE SURE TO READ THROUGH ALL THE STEPS, OR YOU’LL KEEP MAKING THE SAME MISTAKES OVER AND OVER AGAIN!
How to increase your blog traffic with Pinterest?
I’ve been using Pinterest for my blog business for more than a year now. The painful part is that I kept doing the same mistakes over and over again, until one day I realized what it was. This post should help you through mastering your Pinterest strategy in 10 steps that include the mistakes I made, and how to avoid them? Sart now, and increase blog traffic with Pinterest!
Step #1 Setting up a Pinterest business account
I know, this is what you read on literally every Pinterest guide blog post. But it’s essential to set up your Pinterest account properly in order to succeed to drive more traffic to your blog with Pinterest!
You can easily set up a business account from your Pinterest settings, which after you should also claim your blog. Pinterest will provide a HTML code, that you have to embed in your blog’s header. If you’re using WordPress, you can easily do this by entering the theme editor in your menu on the left. You then have to find the header file (it’s usually on the list on the right-hand side near the coding platform). And simply copy in the code between the <header> codes. Then you save it, and you go back on Pinterest to get your blog verified.
At this point, it’s also essential, that you edit your Pinterest profile properly. Add your Instagram username, use beside your name keywords, and add a proper description as well using keywords. For example, if you have a lifestyle blog, make sure to include that. If you’re a food blogger with recipes, include that too! Check out my Pinterest account to get an example.
You must also break down your pins into boards, and sections!
Step #2 Join multiple group boards on Pinterest
I have a post with the best group boards to join on Pinterest, so if you’re heading there, you can find for each niche a list of boards that you must join. For some of them, joining is made easy, but there are some that you must follow some steps to be able to join. Find out everything you need to know about group boards in my post!
Now, the importance of joining group boards to increase traffic with Pinterest!
Group boards are the boards where you can re-share your pins for extra traffic, pins, and clicks. You must obviously pin from these boards, but basically, these will help you increase traffic on your pins, and be discovered by even more people. While you do this, you’ll also get more organic traffic from Pinterest. Getting pins and clicks from group boards will signal Pinterest that your pin is great, so it will also show up for more people in the search results. So how to use Pinterest to drive more traffic to your website? Join Pinterest group boards!
Step #3 Create multiple pins for blog posts
The crucial point to know if you want to increase blog traffic with Pinterest! In the beginning, I create one, or maybe two pins for each of my posts… I don’t know why, but it was surely one of the greatest Pinterest mistakes I have done! This is not the way on how to use Pinterest to drive traffic to your blog! You must create at least 5 pins for each of your posts.
Important to use great quality, beautiful photos for your pins!
Step #4 Don’t follow my mistake with multiple pins
One of the biggest mistakes that I have made was to use the same ugly template with multiple pictures. Don’t do that! Find the most eye-catching templates, and save them for future use. That way, you can re-use them for different posts.
The second mistake I have made with multiple pins was, that I used the same picture for multiple designs. That’s not a problem usually, but if your designs are showing with the same picture, pointing to the same article, having the same pin title, obviously there’s not much chance that they will perform well on Pinterest. Actually, the platform might mark it spammy and they won’t ever drive you any traffic. So mix it up! That’s the key!
Step #5 Sing up for Tailwind
Another super important step you must take if you want to increase blog traffic with Pinterest! You must sign up for Tailwind! There’s a free version for it but it’s limiting you too much. The trial version includes 100 pins or 30 Instagram posts. So, for the same reason, I’m using the premium version, I really do recommend the premium version for Tailwind for full access to the platform!
What is Tailwind and how will it help you increase blog traffic with Pinterest?
Tailwind is an official partner of Pinterest, where you can schedule in advance for even months pins. I can’t tell you how much time and energy it saved me! I have spent days creating my pins directly on Pinterest, and then re-pin them to group boards. Obviously, the number of pins I did this way was also super low, as it was way too much time to waste! Since I joined the Tailwind premium, this platform helped me increase traffic on my blog with Pinterest so much!
Just to give you an idea on the first months with Tailwind. I was getting about 1000-2000 views on my pins before Tailwind, and I was getting 100.000 within 3 months after I started using the platform! Can you believe that? However, when in the autumn of 2020 I took a 2-month break from Pinterest, my traffic dropped to 50.000, but that’s still great traffic with 500+ clicks on my blog when I wasn’t even opening my Pinterest!
I have mentioned before, that you must do for new and old blog posts as well at least 5. If you’re using Tailwind, you can upload there all your pins straight after you’ve made them. This way they won’t get lost on your PC, and whenever you have the time and mood, you can go on your dashboard and do the work.
On Tailwind, you can add 1 pin with a few clicks to all boards and group boards where you want to share them. You can also edit all the titles and descriptions in one tab, adding your blog or website link as well. Keep in mind to select the boards just before scheduling otherwise when you press save on your drafts it’s going to save all pins as separate drafts, which is then painful to schedule one by one.
Step #6 Learn more about using Tailwind Create
First, and most important step in mastering Tailwind is to understand how you should be pinning on Pinterest. Yes, you can upload multiple drafts, and you can save and modify them within one tab. This is super helpful, especially if you have hundreds of pins to share. Though, Tailwind will make visible just 150 of your drafts at once.
Once you’re a premium user on Tailwind, you can set how many pins you want to schedule/day. You can also shuffle your queue, so it’s getting mixed up, and you’re not sharing the same pins on one run. You can schedule in many pins for the long run, and you’ll also save yourself a lot of time!
Tailwind is essential to increase blog traffic with Pinterest!
If you’re pinning something to your own board, and to other group boards as well, you can take the main pin to the top, and place it in a time frame that works for you. Then you can lock these pins, so when you press shuffle, these won’t move.
As I have mentioned, you can create all the Pin descriptions, titles, and add the links in your pins from the draft dashboard. This is super helpful because as I have mentioned, it’s great to have for the same product or article multiple pins. You can also schedule content for Twitter and Instagram with this platform, which makes it even better! All in all, Tailwind is easy to use, and a real-time saver for all bloggers, and businesses as well!
Step #9 Use Tailwind Create to design Pins
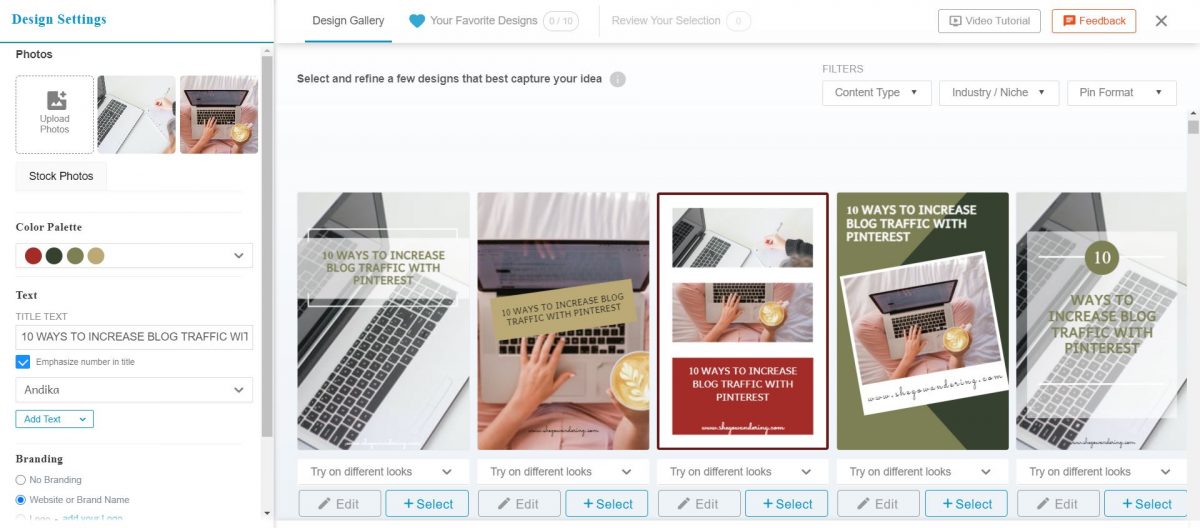
Now the platform has launched the Tailwind Create, where you can create your own pins, design them, and make them as you have imagined them to be! Tailwind create is an intelligent tool, where you can choose colors, pictures, and you also have stock photos to use. Then, you add titles in as well as your logo – if needed.
What the tool does next, is that it will generate multiple designs for your Pin. I have just recently started using Tailwind Create, and I must say that it got me to save even more time with the previous platform I was using to design pins. So not just for scheduling, but with Tailwind Create you can now create beautiful pins as well on the same platform!
Step #8 Don’t follow my mistakes when scheduling Pins
The first mistake to avoid is to not get drained by the fact that you know that you can now pin a lot. Pinterest takes time, whatever you do. Don’t over-spam with Tailwind, because it’s just going to take you to a suspension. Also, while I know it’s fulfilling that now you can post for the same article or product 20 images, avoid using the same titles and same descriptions to all of them!
This is pretty obvious now that I’m writing it down, but for many months I’ve been doing this, and then, I was wondering why the only traffic I get on those pins comes from just group boards and not Pinterest search? Well, it’s spammy behavior, and Pinterest simply didn’t rank my pins.
The third thing that you must focus on, is to not schedule in 10-20 pins for the same day. As the previous mistake, this one can be seen as spammy behavior by Pinterest, as all pins point back to the same link. I have done this when I published my Wandering Cookbook, and guess what… 60+ pins in 2 weeks and all have a maximum of 5 views!
So what to do? Here comes in why it’s better to have multiple drafts for multiple articles/products! Mix it up. If one day you shared 2-3 pins for the same post, the next days share pins for other posts. Leave a little bit of time between the same content. This (for me at least) looks like it’s working out now really well!
Step #9 Master your keyword research on Pinterest
If you’re not doing great with everything that I’ve been writing down above, there’s another key factor you must master to increase blog traffic with Pinterest. If you don’t master this one, you’ll never actually succeed with Pinterest I’m afraid. And again, I’m talking from my own experience!
I’ve pinned over the past year at least 600 pins on Pinterest, and I’ve never made proper keyword research. As I have said, I did get more organic traffic from Pinterest over the past months, but with these many pins… I couldn’t help but wonder, what am I doing wrong? How do others get even millions of views and I can’t go over 110K?
Then, by doing research and analyzing my pins, I have realized, that I’ve been doing it all wrong. The keywords I thought could rank, weren’t even between the best ranking ones! How do I know this?
You must go into Pinterest, and simply look up what gives you in the search result if you enter one keyword. It will give you ideas on more keywords as well. You can also search for other’s pins, and check their description and titles for ideas. If you have a business account, you can run ads on Pinterest. And while you enter creating ads, you have also access to the keyword research platform. This can help you find keywords for your pins.
Step #10 Don’t follow my mistake when pinning on Pinterest
As for the last one, I’ll write down something that I’ve done (again) the wrong way. Trying to increase blog traffic with Pinterest is great, and above I have given you all the tools you need, such as the business account, using Tailwind. I have also explained the mistakes and how to avoid them, but this is still not enough to succeed on Pinterest!
Here’s one more key factor to use Pinterest for blogging! In order to get more organic traffic from Pinterest, and actually grow your Pinterest visibility, you can’t just pin your own pins on your boards. You must mix it up. You must pin other people’s pins as well on the side of yours. I wouldn’t say that you should do 50/50 your own pins and others’ pins, but at least 60/40.
Why is this important? It’s giving Pinterest another sign, that you’re not spamming, and you are an active user of the platform. Take it as a good point from Pinterest’s algorithm!
There’s no short answer on how to use Pinterest to drive traffic to your website!
I know it’s a lot, and I know it’s some investment and time, but you didn’t read through the whole article, you’ll keep making the same mistakes I did, and the way to successful blog traffic with Pinterest will be really delayed.
You must also check out the articles for starting a blog, and about Pinterest group boards. Also, check out my post with SEO for bloggers if you’re looking for a way to grow traffic on your website.

One of the best and my favorite blog ever.